When it comes to baseboard caulking, there are some secret tips and tricks that DIYers often wish they knew. From preparation to application, these techniques can make all the difference in achieving a professional-looking finish.
So, let's dive into the secrets of baseboard caulking!
The first secret tip is to make sure the baseboards are clean and free of dust and debris before starting the caulking process. This will ensure better adhesion and a smoother finish. Use a damp cloth or vacuum to remove any dirt or particles from the surface.
Next, it's important to choose the right caulk for the job. Silicone caulk is the most recommended option for baseboard caulking as it is flexible and offers excellent water resistance.
Make sure to select a caulk that matches the color of your baseboards for a seamless blend.
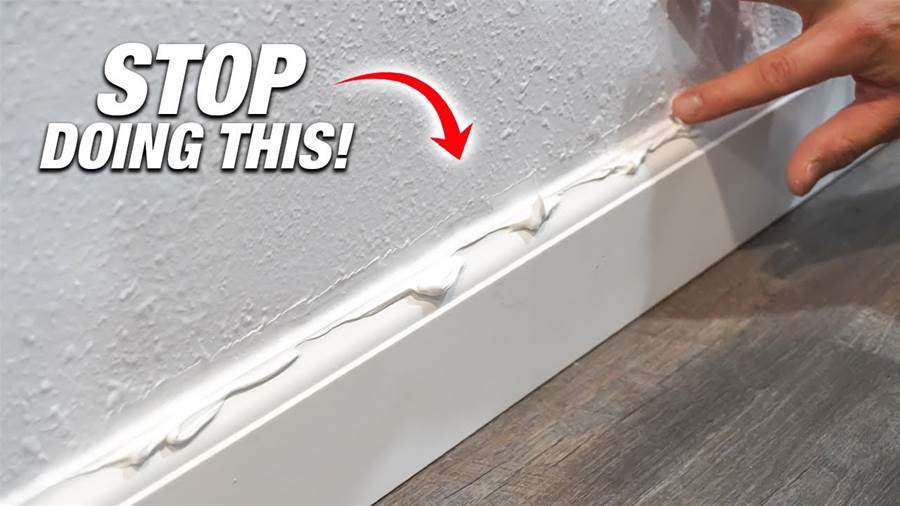
To achieve a professional-looking finish, use painter's tape to create clean and straight lines along the edges of the baseboards. Apply the tape about 1/8 inch above the baseboard to leave space for the caulk. This will prevent any smudging or excess caulk from marring the walls.
Before starting the actual caulking process, cut the caulk nozzle at an angle of about 45 degrees.
This will allow for better control and precision while applying the caulk. Keep in mind that you can always trim the nozzle further if needed.
Now, it's time to apply the caulk. Start at one end of the baseboard and hold the caulk gun at a 45-degree angle. Apply a steady and even bead of caulk along the gap between the baseboard and the wall. Keep a damp cloth or paper towel handy to wipe off any excess caulk immediately.
To achieve a professional finish, use a caulk finishing tool or a putty knife to smooth out the caulk.
Gently glide the tool along the caulk line, applying even pressure to create a clean and seamless finish. Wipe off any excess caulk from the tool as you go.
Once you have finished caulking the baseboards, remove the painter's tape while the caulk is still wet. This will prevent the tape from pulling off any dried caulk and ensure crisp lines.
Finally, allow the caulk to dry completely according to the manufacturer's instructions before painting or applying any other finishes. This will help the caulk to cure properly and provide a long-lasting seal.
By following these secret tips and tricks, DIYers can achieve professional-looking results when caulking baseboards. From proper preparation to precise application and finishing techniques, these secrets can make all the difference in creating a seamless and beautiful finish. So, grab your caulk gun and give your baseboards a fresh and polished look!